Ads
ExcelDarkThemeFix
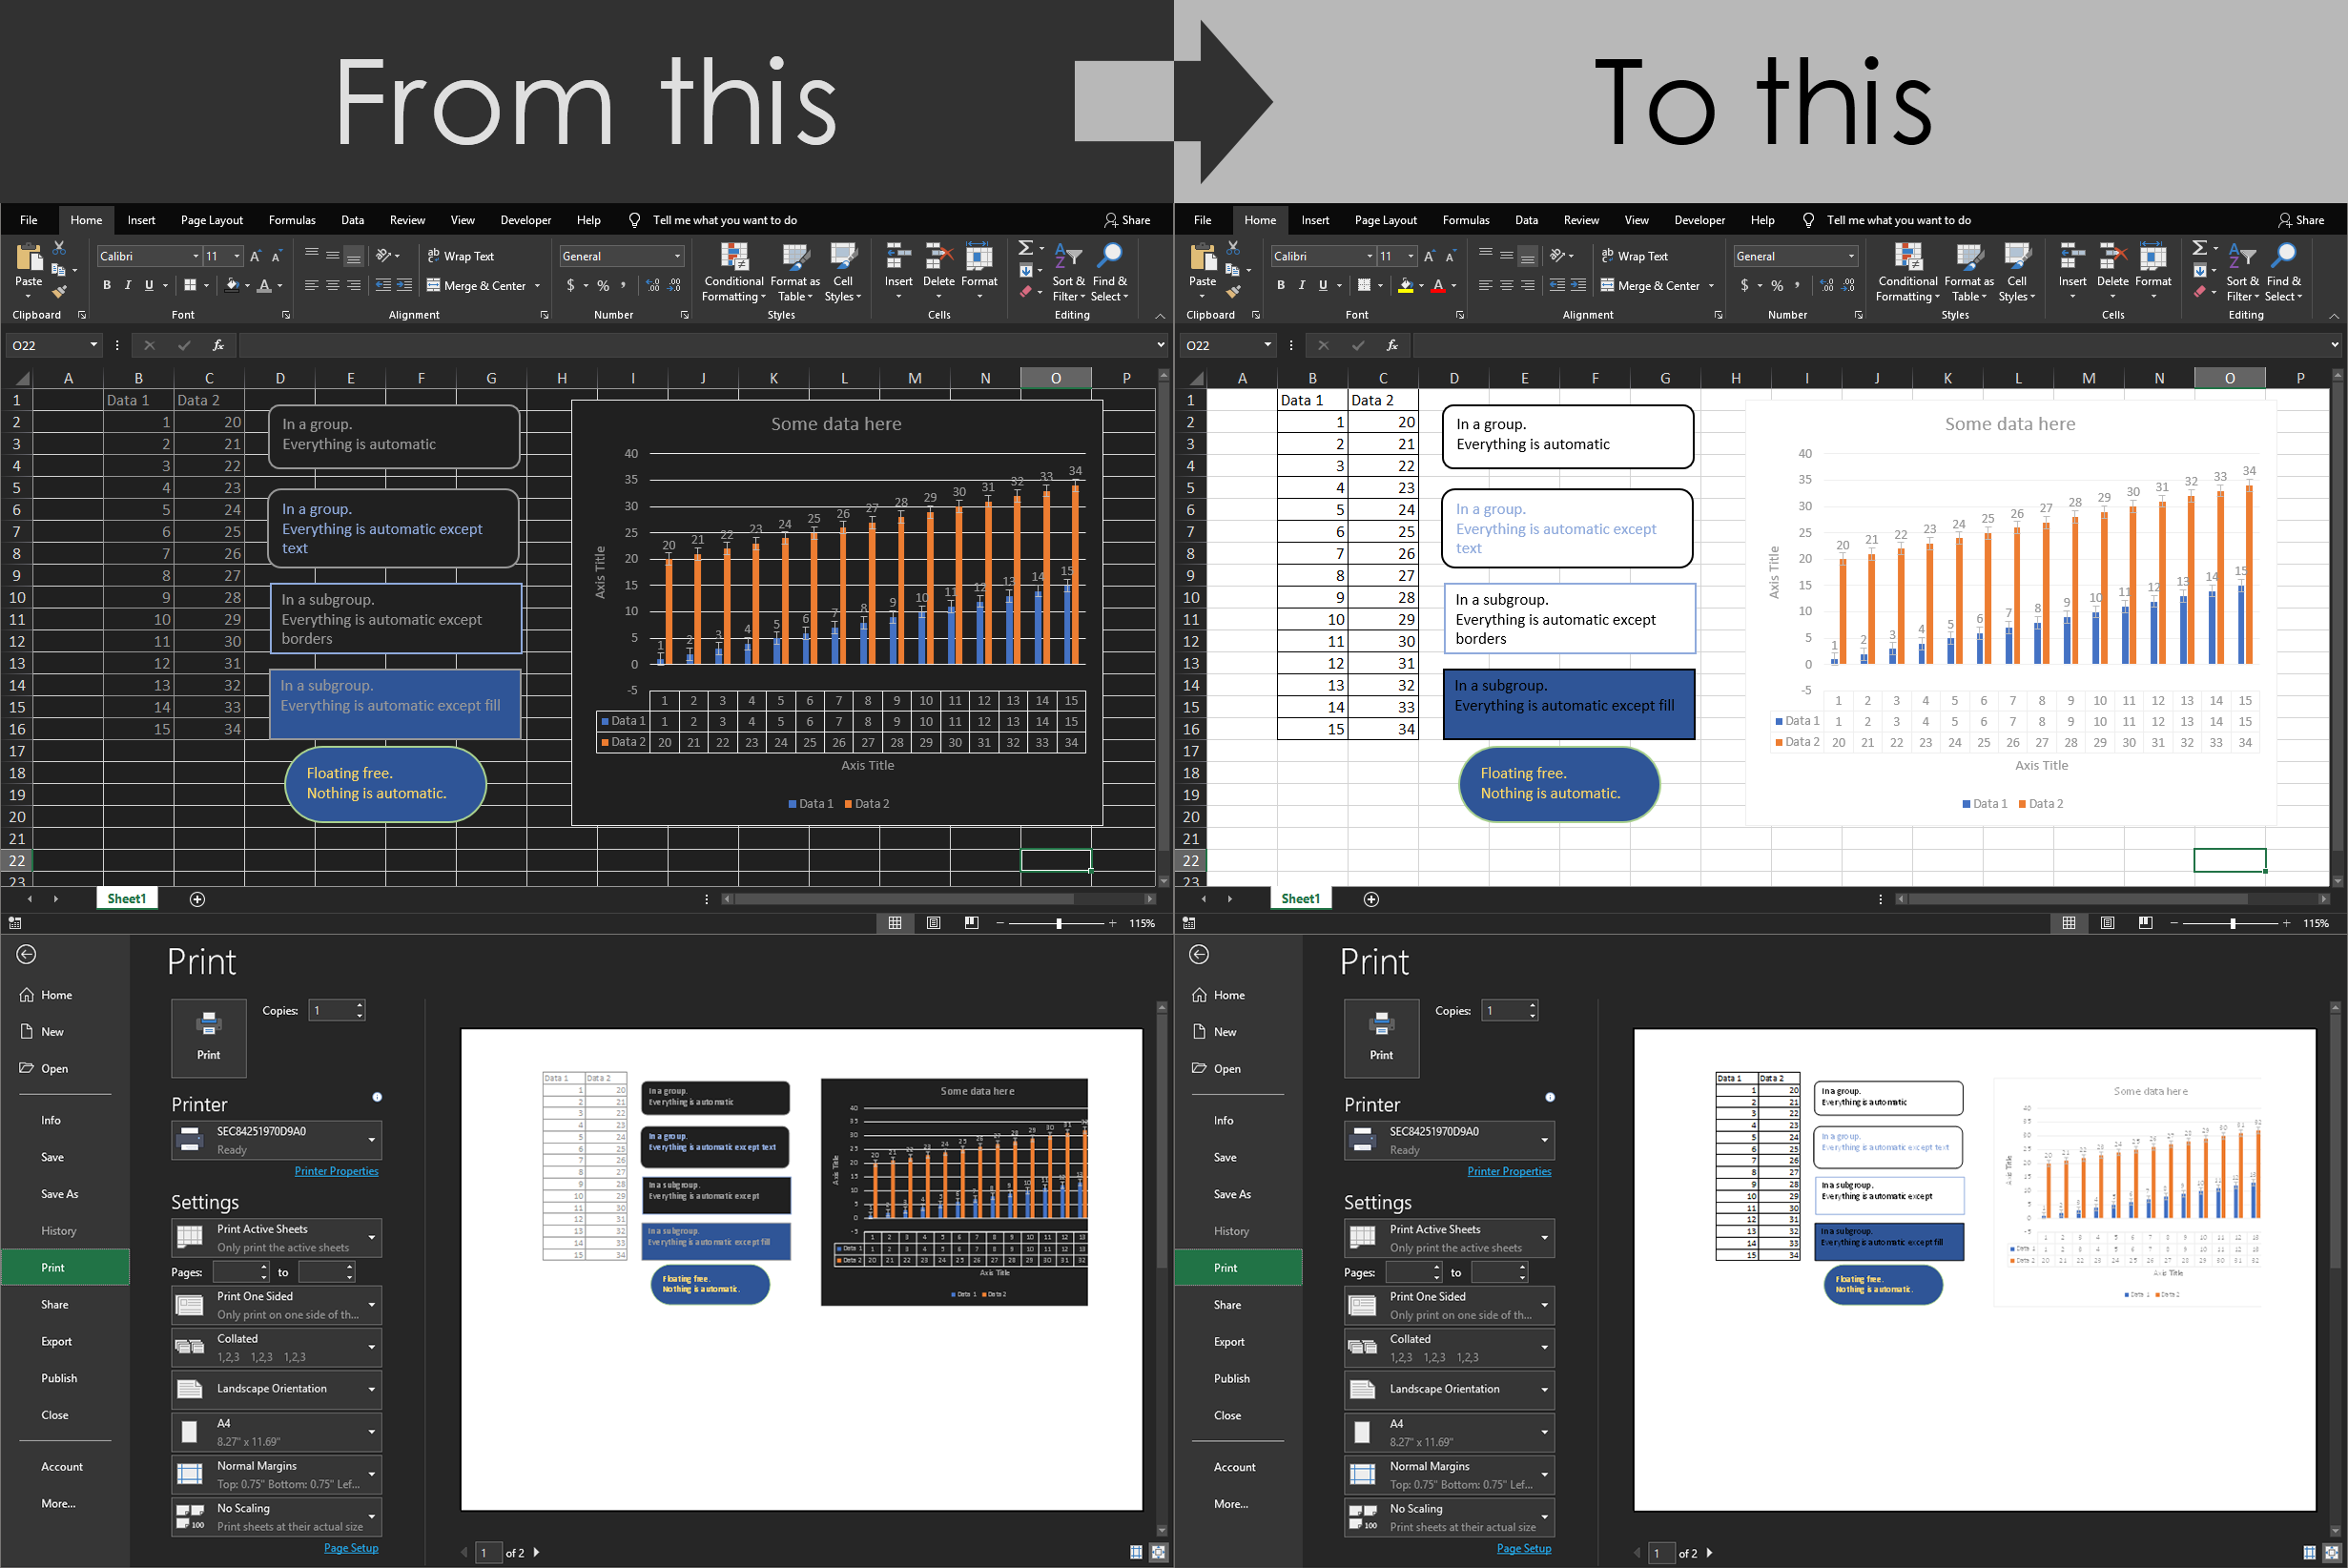
Fixes Microsoft Excel appearance when custom Windows theme is used.
When the custom dark Windows theme is used, sheets, graphics items, charts and everything that have an “Automatic color” are displayed, exported and printed in the wrong colors.
This happens because Excel picks system colors (instead of using predefined ones) for the “Automatic color” which are altered by the themes.
This Add-In aims to fix this issue by setting colors to normal.
If you find this Add-In useful, you also might want to get PowerPointDarkThemeFix.
What is fixed?
- Sheets
- Cells
- Graphic shapes
- Charts – except slightly different font colors
- Styles
- Fixing multiple files in one click
What has workaround?
- Charts’ font colors – there’s an option to set it to black.
- Cell’s dark background when editing – there’s an option to fix it, but you won’t be able to undo anything. As an alternative, use the formula thingy right above the sheet to see what you type.
- Different cells’ fill outside of used range – fill can be either preserved (including an actual automatic color, default behavior) or removed completely. There’s an option to tweak it.
- OLE Excel objects – you need to manually open it, save and close.
Enabling configurable options is described under the Configuration section.
What is not fixed?
- Colors may still be wrong – some Excel version will change colors to an arbitrary indexed colors depending on a theme. Not all colors and themes are affected.
- SmartArt – as far as I’ve tried, unfixable.
- Automatic color replacement – will make things undoable and heavily slow down Excel (if not make it unusable).
- Table styles – impossible to fix built-in styles. Cells with custom styles are being fixed automatically without any issues.
- Altering backgrounds – using background is a part of the fix. There’s no way of detecting whether the sheet has a background, so Add-In just will replace it.
- Protected sheets – need to manually unprotect it, click “Fix all” button and, if needed, protect it again.
- Possibly, some of Shape.Types.
- You name it, I’m not an Excel expert :D
If you know how to fix any of these things, please, fill out an issue and describe a solution. I will greatly appreciate your effort!
Compatibility list
Fully compatible with Microsoft Office 2016, 2019 and 2021 (starting from build 14430.20306).
Reportedly, doesn’t fully work in 365, requires installation using “hard way” instructions and has to be put in a localized “AddIns” folder.
If you can test it with Office versions other than listed above, please, fill out an issue and I’ll update this list.
Installation
For download, visit project’s GitHub page.
Basically, you just need to install an Add-In. You can either stick to the instructions below or google a better guide.
Easy way
Warning: this method uses XLSTART folder which appears to be working fine, but it’s not an exactly correct way to install Add-Ins.
- Download ExcelDarkThemeFix.xlam file and ExcelDarkThemeFixBG folder.
- Navigate to %AppData%\Microsoft\Excel\XLSTART and put both ExcelDarkThemeFix.xlam and ExcelDarkThemeFixBG here. Do NOT move anything from ExcelDarkThemeFixBG and don’t rename it!
- Open Excel and enjoy the Add-In.
If this method didn’t work for you, please, create an issue and try method below.
Hard way
This is more correct way to install an Add-In, but it’s hard to follow.
- Download ExcelDarkThemeFix.xlam file and ExcelDarkThemeFixBG folder.
- “Unblock” Add-In:
- Move the cursor over ExcelDarkThemeFix.xlam, click right mouse button and click “Properties”.
- At the bottom of the window find “Unblock” checkbox and check it. Then click “OK”.
- If you don’t have this checkbox, please, proceed to the rest of the steps.
- Navigate to %AppData%\Microsoft\AddIns and put both ExcelDarkThemeFix.xlam and ExcelDarkThemeFixBG here. Do NOT move anything from ExcelDarkThemeFixBG and don’t rename it!
- Enable macros:
- Open Excel.
- Navigate to “Options”.
- On the left side of the window click “Customize Ribbon”.
- On the right side of the window check “Developer” and “Add-Ins” boxes.
- Click “OK” and restart Excel.
- Enable this Add-In:
- Open “Developer” tab.
- Click on “Excel Add-Ins”.
- Check the “ExcelDarkThemeFix” box.
- Click “Ok” and restart Excel.
- If Add-In doesn’t work:
- If you have an antivirus:
- Add ExcelDarkThemeFix.xlam to the exceptions. Some antiviruses might prevent Add-Ins from running. Don’t worry, this Add-In won’t make you computer explode :p Check the sources if you’re unsure.
- Restart Excel and see if Add-In now works. If yes, you’ve installed Add-In, don’t follow the steps below.
- Navigate to “Options”.
- On the left side of the window click “Trust Center”.
- Click “Trust Center Settings…”
- Now you’ve got three options, try one after another:
- Unblock from PowerShell:
- Open PowerShell.
- Type Unblock-File -Path “AppData\Roaming\Microsoft\AddIns\ExcelDarkThemeFix.xlam” and hit Enter.
- Close PowerShell.
- Trust only installed Add-Ins:
- On the left side of the Trust Center window click “Trusted Locations”.
- Click “Add Location”.
- Click “Browse…”
- Navigate to %AppData%\Microsoft\AddIns (find a localized “AddIns” folder for non-English Office 365 verison) and click “OK”.
- Click “OK” in all opened Excel windows.
- Trust EVERY Add-In you open:
- On the left side of the Trust Center window click “File Block Settings”.
- Find “Excel 2007 and later Add-In files” row and uncheck both of the checkboxes. Well, you may uncheck all the rows to make your life easier.
- Click “OK” in all opened Excel windows.
- Unblock from PowerShell:
- Restart Excel.
- If you have an antivirus:
Edge case: If you’ve just installed MS Office and haven’t rebooted, install ExcelDarkThemeFix and reboot your PC.
Usage
Add-In does everything automatically. However, if you’ve set automatic colors to something and don’t want to fix it yourself, in Excel:
- Open “Add-Ins” tab (if you didn’t have it, it has been added automatically).
- Click “Fix all open workbooks”.
- Read text in pop-up dialog. It says that if you click “Yes”, you won’t be able to undo the changes you’ve made. The only way to undo something is to close all workbooks without saving and open them again.
- Click “Yes” if you will not need to undo anything.
Configuration
This Add-In provides some cool but unsafe options that you can enable. In order to do this, in Excel:
- Open “Developer” tab.
- Click on “Visual Basic”.
- On the left pane, navigate to element displayed on the following screenshot and double-click on it:

You’ll see some code. Don’t freak out, just follow the instructions in it. Read everything carefully!
When you’re done, press Ctrl+S and restart Excel.


Good tutorial but it’s too hard. Anw, thanks a lot.
Excel is never my strength. It’s so complicated. haiz
This forum is amazing and there is a lot of useful content here. Companies can use this content to further improve the quality of disposable nitrile gloves although they have not received any complaints about them yet. However, there is still room for improvement.
It is extremely difficult to rule! I appreciate your support.
this rules so hard! thank your support!